



today's howtos
Submitted by Roy Schestowitz on Monday 21st of March 2022 08:45:19 AM
Filed under 
-
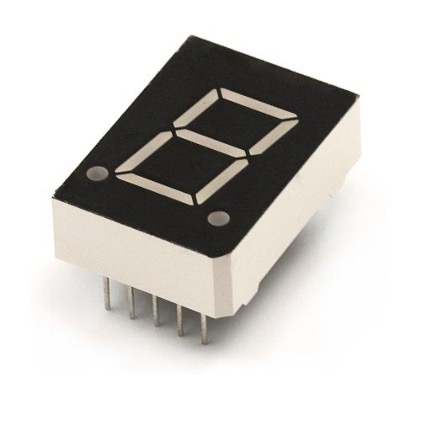
How to Interface 7 Segment Display with Arduino Uno
If we have to display the limited amount of data having only numeric and alphabets, we can use a 7 seven segment display. There are a variety of applications where 7 segments are used. In this guide a digital dice is created using a 7 segment and Arduino Uno. Schematics, code and hardware demonstration is also provided in this guide.
-
How to Make Digital Dice Using 7 Segment and Arduino Uno
To detect the presence of any moving body we use the PIR sensor and this sensor can be named as the motion detection sensor as well. This article is a detailed guide on what a PIR motion sensor is and to demonstrate how we can interface the motion detection sensor with Arduino Uno we have designed a circuit and implemented it on the hardware in this guide.
-
How to Interface PIR Motion Detection Sensor with Arduino Uno
The Arduino platform facilitates its users with providing hardware and software assistance in making either beginner or advance level projects. Similarly with the help of Arduino boards the interfacing of the multiple devices with the microcontroller has been made easy. These devices also include the different types of sensors and one which we are going to interface with Arduino Uno in this discourse. The sensor we are talking about is the motion detection sensor which detects the movement of the objects in its vicinity. This sensor is mostly used in the applications where movement of any object is to be monitored.
-
How to Control 12V Devices with Arduino Uno
The interfacing of different devices with microcontrollers has been made easy with the help of Arduino boards. The Arduino boards are the advanced form of the microcontroller that can be used for various tasks. By controlling the devices, we can perform certain tasks at certain times so in this way we can create automation projects. So, to demonstrate how we can control the devices we have used the Arduino Uno and NPN transistor to control a 12-volt device.
-
How to add and switch users on Raspberry Pi operating system
The Raspberry Pi is a Debian-based Linux distribution in which we can manage the operating system in a similar way as in other Debian-based distributions. The Raspberry Pi OS is a multi-user operating system that means different users can operate a single system so that they can have the privacy of their data stored in the system as no other user can access it (until he has the authentication password of that user account).
In this write-up, we will learn the method by which we can switch from one user to the other user in the Raspberry Pi and also learn the method of creating the user as well as removing the user.
-
How to access boot config file on Raspberry Pi
A boot in a computer system is a process that tells the computer which instructions and programs should be executed when the computer is turned on. The Raspberry Pi board is also a compact size computer in which a boot is responsible for the behavior of the Raspberry Pi at the time of startup. Now, from where the boot gets the instruction that should be performed at boot time, all instructions are stored in the configuration file of the boot.
-
How to find out the version of the Raspberry Pi operating system
The software and hardware details of the Raspberry Pi boards can be checked from the terminal of the Raspberry Pi OS. On a daily basis, new releases of the software are being launched in order to confirm which version of the Raspberry Pi operating system we are using, we can use some commands. In this article, some important commands are explained to check the versions of software and hardware of the Raspberry Pi.
-
How to find the hardware information of the Raspberry Pi
The Raspberry Pi is a small size computer board that implies it has all the hardware specifications which a normal PC and laptop have. The Raspberry Pi device contains the RAM, a CPU, and other peripheral devices of the computer like storage media and USB which can be connected to the Raspberry Pi board. In this write-up, we will discover different commands to find out the details of the hardware specifications of a Raspberry Pi board.
-
How to get started with Java on Raspberry Pi operating system
Many applications and games are designed in a programming language known as Java and the Java development software is supported by different platforms like Windows, macOS, and all distributions of Linux.
In Raspberry Pi, the package Java is already installed, but if it is not installed, then it can be installed using simple commands. There are two types of packages in the Raspberry Pi operating system repository which are JDK (Java Development Kit) and JRE (Java Runtime Environment). The JDK includes the JRE and the JRE includes the JVM (Java Virtual Machine) which includes the classes and binaries which are required to run the Java programs.
In this write-up, we will learn the installation and usage of Java on the Raspberry Pi operating system.
-
How to install and use the Vim text editor on Raspberry Pi
There are many text editors like nano, vim, mu but the most used and recommended text editor for the Raspberry Pi and other Debian-based distributions is the VIM text editor.
-
How to uninstall software from the Raspberry Pi operating system
We install many packages on Raspberry Pi but most of them we do not use after performing a particular task. Hence these packages occupy the space of the device. These packages occupy the memory of the system, which makes the memory-less for the installation of the future packages and also slows down the performance of the system.
We can uninstall such packages which are of no use from the terminal as well as from the GUI method. In this write-up, both these methods of uninstalling software from the Raspberry Pi have been explained.
-
How to install the DOSBox on Raspberry Pi operating system
The DOSBox is an emulator which is open source so anyone can access it by downloading it, moreover, it is supported by different operating systems like macOS and different distributions of Linux. The DOSBox is a command-line-based emulator which is used to operate different DOS applications but mostly it is used for DOS games.
The DOSBox can be installed on the Raspberry Pi operating system and its installation procedure has been discussed in this article with the usage of a DOS application.
-
How to use the keyboard shortcuts on Raspberry Pi operating system
Category: raspberry piThe keyboard shortcut keys provide ease in performing different tasks like opening the file, saving the file, and deleting the file. In the Raspberry Pi, there are different shortcut keys that are used to perform different tasks whereas the Raspberry Pi operating system allows us to make our own keyboard shortcuts for different purposes which are known as customized shortcuts.
In this write-up, we will not only learn about the default keyboard shortcuts of the Raspberry Pi but also learn the method of adding our own customized shortcuts.
-
How to free up the space on the Raspberry Pi operating system
Raspberry Pi does not come with built-in storage; a microSD card is used to hold the operating system and packages. The SD card can quickly be filled up by the operating system updates and many libraries downloaded with the packages we install. Therefore, unused packages and files should be removed from time to time. This write-up is very useful as different commands to free up the space using the terminal on Raspberry Pi have been explained.
-
How to play classic NES and SNES games on Raspberry Pi
The Nintendo Entertainment System (NES) was the first home video gaming console launched in the year 1985 and was a die-hard choice of all the gamers in those days. Following the high demand, the Super Nintendo Entertainment System (SNES) was launched after five years of NES release with much improved graphics that time.
The NES games include popular Super Mario Bros, Legend of Zelda and many more whereas on SNES you can play games like Legend of Star Wars, Super Metroid.For the Raspberry Pi users, playing the classic NES and SNES games on their device will be a worthy experience and for those who are interested in playing these games then they should consider installing an emulator preferably RetroPie gaming emulator that lets you play these games on your device quite easily. You won’t find the NES and SNES games on RetroPie with a one click, you will need to perform some process in order to run these games on RetroPie.
In this article, we will show you how you can complete the game installation preferably NES and SNES games in order to play them on RetroPie emulator.
»
-

- Login or register to post comments
 Printer-friendly version
- 1439 reads
 PDF version
More in Tux Machines
- Highlights
- Front Page
- Latest Headlines
- Archive
- Recent comments
- All-Time Popular Stories
- Hot Topics
- New Members
digiKam 7.7.0 is released
After three months of active maintenance and another bug triage, the digiKam team is proud to present version 7.7.0 of its open source digital photo manager. See below the list of most important features coming with this release.
|
Dilution and Misuse of the "Linux" Brand
|
Samsung, Red Hat to Work on Linux Drivers for Future Tech
The metaverse is expected to uproot system design as we know it, and Samsung is one of many hardware vendors re-imagining data center infrastructure in preparation for a parallel 3D world.
Samsung is working on new memory technologies that provide faster bandwidth inside hardware for data to travel between CPUs, storage and other computing resources. The company also announced it was partnering with Red Hat to ensure these technologies have Linux compatibility.
|
today's howtos
|


.svg_.png)

 Content (where original) is available under CC-BY-SA, copyrighted by original author/s.


Recent comments
1 year 11 weeks ago
1 year 11 weeks ago
1 year 11 weeks ago
1 year 11 weeks ago
1 year 11 weeks ago
1 year 11 weeks ago
1 year 11 weeks ago
1 year 11 weeks ago
1 year 11 weeks ago
1 year 11 weeks ago