

Language Selection

English French German Italian Portuguese Spanish

Open Hardware/Modding: Arduino, Raspberry Pi, and Intel's Bad 'Clone'

Filed under
Hardware
  • This small device helps test thousands of old PS/2 keyboards | Arduino Blog

    Some vintage computer keyboards, especially units like the IBM Model M, are still quite desirable. Usually they’re popular among mechanical keyboard or retro computing enthusiasts who want period-correct hardware. YouTuber Midwest Cyberpunk had thousands of these old keyboards and needed a way to test them. So he built this small Arduino-based device that displays the text input from PS/2 keyboards.

    IBM developed the PS/2 port standard in the ’80s for the IBM Personal System/2 series of computers. By the ’90s, it was the standard for connecting keyboards and mice to PCs. USB made the PS/2 port almost obsolete in the ‘00s, which means that there aren’t many modern computers that still have PS/2 ports. Midwest Cyberkpunk could have used a vintage computer for testing his keyboards, but wanted a more portable option. This PS/2 Keyboard Tester device is easy to carry and provides instant results.

  • Best Raspberry Pi Accessories of 2022 | Tom's Hardware

    Raspberry Pis are still in short supply, but you can still purchase a Raspberry Pi for as little as $5 (for the Raspberry Pi Zero) or more likely from $35 (for the Raspberry Pi 4 1GB), but you'll need a few extra products to make it run. There's a whole world of accessories that help you make the most of the Raspberry Pi's GPIO. These accessories have been around since the Raspberry Pi was released, when it had just 26 GPIO pins. Using special addon boards we can take advantage of the more modern Raspberry Pi's 40 pin GPIO to control and interact with electronic components and create diverse projects such as robotics, machine learning and IoT and even our own home server.

  • Best Amazon Prime Day Raspberry Pi Deals 2022
  • Intel-Based Raspberry Pi Alternative UP 4000 Available For Pre Order [Ed: 3-5 times more expensive than Raspberry Pi and a lot less efficient, full of security holes]

    The Raspberry Pi is rather hard to get a hold of right now (we have a few tips on where to buy a Raspberry Pi and a list of best Raspberry Pi deals if you have your heart set on one) but you can still find alternatives on the market for example the Khadas VIM 4.

More in Tux Machines

today's howtos

  • How to Change Comment Color in Vim – Fix Unreadable Blue Color

    Are you annoyed about the comment color in vim? The dark blue color of the comment is often hard to read. In this tutorial, we learn how to change the comment color in Vim. There are few methods we can use to look vim comment very readable.

  • How to Add Repository to Debian

    APT checks the health of all the packages, and dependencies of the package before installing it. APT fetches packages from one or more repositories. A repository (package source) is basically a network server. The term "package" refers to an individual file with a .deb extension that contains either all or part of an application. The normal installation comes with default repositories configured, but these contain only a few packages out of an ocean of free software available. In this tutorial, we learn how to add the package repository to Debian.

  • Making a Video of a Single Window

    I recently wanted to send someone a video of a program doing some interesting things in a single X11 window. Recording the whole desktop is easy (some readers may remember my post on Aeschylus which does just that) but it will include irrelevant (and possibly unwanted) parts of the screen, leading to unnecessarily large files. I couldn't immediately find a tool which did what I wanted on OpenBSD [1] but through a combination of xwininfo, FFmpeg, and hk I was able to put together exactly what I needed in short order. Even better, I was able to easily post-process the video to shrink its file size, speed it up, and contort it to the dimension requirements of various platforms. Here's a video straight out of the little script I put together: [...]

  • Things You Can And Can’t Do

    And it got me thinking about what you can and can’t do — what you do and don’t have control over.

  • allow-new-zones in BIND 9.16 on CentOS 8 Stream under SELinux

    We run these training systems with SELinux enabled (I wouldn’t, but my colleague likes it :-), and that’s the reason I aborted the lab: I couldn’t tell students how to solve the cause other than by disabling SELinux entirely, but there wasn’t enough time for that.

  • Will the IndieWeb Ever Become Mainstream?

    This is an interesting question, thanks for asking it, Jeremy. I do have some history with the IndieWeb, and some opinions, so let’s dive in.

    The short answer to the question is a resounding no, and it all boils down to the fact that the IndieWeb is really complicated to implement, so it will only ever appeal to developers.

  • How to Install CUPS Print Server on Ubuntu 22.04

    If your business has multiple personal computers in the network which need to print, then we need a device called a print server. Print server act intermediate between PC and printers which accept print jobs from PC and send them to respective printers. CUPS is the primary mechanism in the Unix-like operating system for printing and print services. It can allow a computer to act as a Print server. In this tutorial, we learn how to set up CUPS print server on Ubuntu 22.04.

Open Hardware: XON/XOFF and Raspberry Pi Pico

  • From XON/XOFF to Forward Incremental Search

    In the olden days of computing, software flow control with control codes XON and XOFF was a necessary feature that dumb terminals needed to support. When a terminal received more data than it could display, there needed to be a way for the terminal to tell the remote host to pause sending more data. The control code 19 was chosen for this. The control code 17 was chosen to tell the remote host to resume transmission of data.

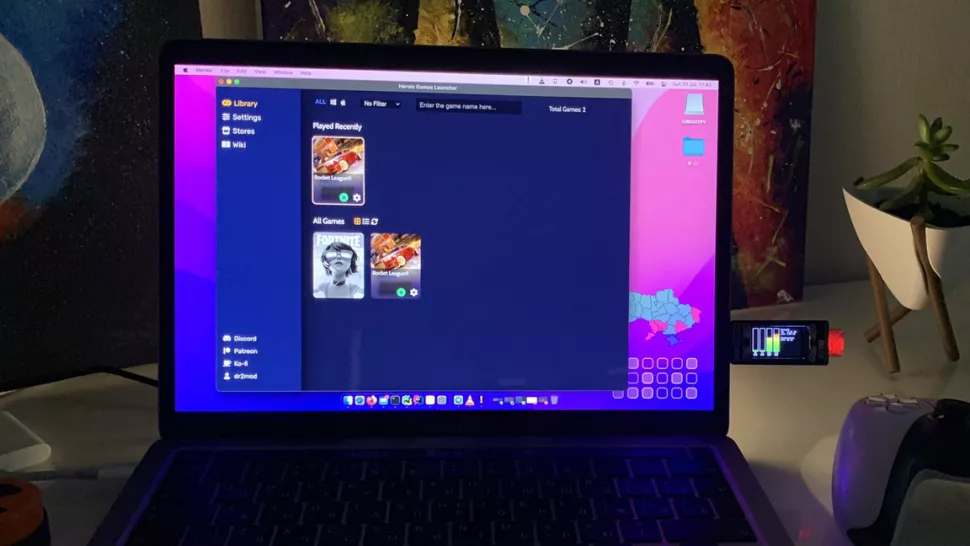
  • Raspberry Pi Pico Used in Plug and Play System Monitor | Tom's Hardware

    Dmytro Panin is at it again, creating a teeny system monitor for his MacBook from scratch with help from our favorite microcontroller, the Raspberry Pi Pico. This plug-and-play system monitor (opens in new tab) lets him keep a close eye on resource usage without having to close any windows or launch any third-party programs. The device is Pico-powered and plugs right into the MacBook to function. It has a display screen that showcases a custom GUI featuring four bar graphs that update in real-time to show the performance of different components, including the CPU, GPU, memory, and SSD usage. It makes it possible to see how hard your PC is running at a glance.

Security Leftovers

How to Apply Accent Colour in Ubuntu Desktop

A step-by-step tutorial on how to apply accent colour in Ubuntu desktop (GNOME) with tips for Kubuntu and others. Read more